Cross Roller Bearing for Slew Joint or Turntable
Description
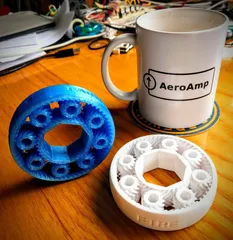
PDFThis is a cross roller bearing useful for a slew joint or a turntable.
The outer race is a single piece. It now has an optional pulley for a GT2-6 timing belt. Note that the code for the pulley is a pretty bad hack. You will need to alter settings in the timing2.scad file if you want to make any changes to the pulley. It is not coded as a proper module that could be called from the main file slew10.scad.
The inner race is split into an upper and lower section so the bearing can be assembled. These two parts are threaded together. So by turning the thread you can set the tension on the rollers. There are two sets of holes that allow locking the thread position by inserting a bit of raw 1.75 mm fiber into the holes.
The carrier that keeps the rollers separated is a bit flimsy, it can be difficult to get a good print. Be sure your first layer is really good on that part.
The larger diameter bearings tend to work better. This one (150 mm OD) is considerably smoother than the smaller Slew 8 version (70 mm OD).
Added options for connecting tabs on the inner and outer ring, facing either in or out.
This version updates thing:4529219 (Slew 8, Cross Roller Bearing).
Print instructions
Unassociated tags: cross roller
Category: Parts Summary
This is a cross roller bearing useful for a slew joint or a turntable.
The outer race is a single piece. It now has an optional pulley for a GT2-6 timing belt. Note that the code for the pulley is a pretty bad hack. You will need to alter settings in the timing2.scad file if you want to make any changes to the pulley. It is not coded as a proper module that could be called from the main file slew10.scad.
The inner race is split into an upper and lower section so the bearing can be assembled. These two parts are threaded together. So by turning the thread you can set the tension on the rollers. There are two sets of holes that allow locking the thread position by inserting a bit of raw 1.75 mm fiber into the holes.
The carrier that keeps the rollers separated is a bit flimsy, it can be difficult to get a good print. Be sure your first layer is really good on that part.
The larger diameter bearings tend to work better. This one (150 mm OD) is considerably smoother than the smaller Slew 8 version (70 mm OD).
Added options for connecting tabs on the inner and outer ring, facing either in or out. The gcode is for tabs facing inward on both the outer race and the inner race.
This version updates thing:4529219 (Slew 8, Cross Roller Bearing).
Print Settings
Printer Brand: Prusa
Printer: i3 MK3 MMU 2
Rafts: No
Supports: No
Resolution: 0.1 mm for races, 0.3 elsewhere
Infill: 20% triangular
Filament: generic PetG tested, PLA should be fine any
Notes:
IMPORTANT: Print each roller individually. Or put a bunch on your buildplate and select the output option to "complete individual objects". Otherwise as the hotend moves between the rollers on each layer it will leave a tail that sticks horizontally off the roller surface. Printing each individually solves this since the tail sticks up vertically and gets covered by the next layer of plastic.
The bearing races should be printed at 0.1 mm layer height. Everything else can be set for 0.3 mm. If you have adaptive layer thickness it can save time on some of the parts. The carrier can be printed entirely at 0.3 mm.
Print rollers with all 0.1 mm layers, 4 perimeters, 8 top/bottom layers, and NO infill.
Post-Printing
Inspect all the rollers. Test them by rolling them across your build plate since that is usually smooth and flat. Print a few extras so you can throw out any bad rollers.
I use 100 grit sandpaper on the threads and sharp corners, also on the carrier to smooth off any strings. Carefully wash off any dust and grit.
Assemble the bearing by placing the inner low and carrier into the outer race. Then add the rollers into the carrier. It may take a little force to pop them into place between the races. Finally screw on the top race. Adjust the tension on the rollers by screwing / unscrewing the thread. If the motion is jerky your tension is too high. It should spin freely and drift for one full revolution before stopping.
Use a couple of short pieces of raw 1.75 mm filament to lock the threads in place using both sets of locking holes. Don't lock the bearing until you are sure of the tension setting as it can be difficult to remove the locking pins. The upper and lower holes are printed with different spacing. You should find at least 1 pair of holes that line up for your desired tension.
Silicon oil makes a big difference in how easily the bearing will roll. They will still work dry.
How I Designed This
This was designed in OpenScad. The source files are included so you can modify this part for your application.
Thanks to Dan Kirshner for the threads.scad code.
Also Oscar (https://www.thingiverse.com/0scar/about) for the timing belt pulley code, timing2.scad.
Tags
Model origin
The author marked this model as their own original creation. Imported from Thingiverse.


