Ghostbusters 1 - Muon Trap - Sides - Remix

Description
PDFIf you look very carefully at the original GB1 trap you will notice that peeking out from under the aluminum sides there are screws that were used to assemble the trap. This remix adds in holes for real or faux screws as well as a place to mount some internal electronics.
...
Original Idea
Originally I created a template to determine the positions of the holes and used a countersink bit to make room for screws. This worked, but I wasn't happy with the position of the holes, or how messy it looked as it tore through the infill.
In the end it looked pretty good, but with the inaccurate holes I decided to go back and see what I could do to fix it. One option was to fill the holes with epoxy, sand it down and repaint it.The other was to just remodel the side panels to incorporate the screws.
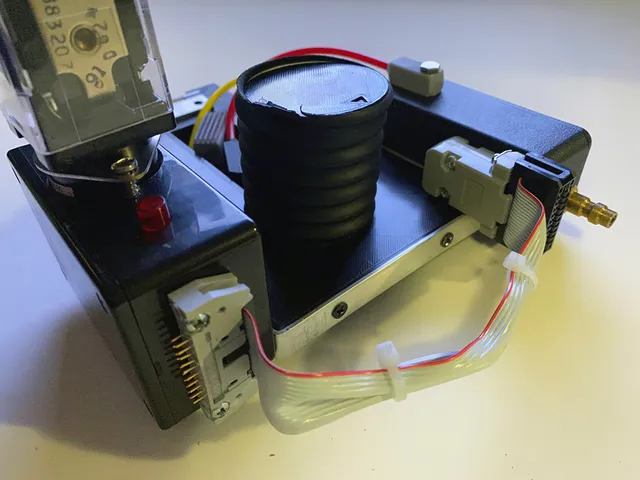
Another modification I had made was to create a mount for the bargraph and proto board. This original design allowed the electronics to be screwed in place instead of taped like the original instructions suggested.
This also worked great, but I thought since I was remodelling the panels anyway, I could just integrate that design.
New Design
These new panels are for the GB1 trap. I removed the extra holes for the GB2 version (I can add one later if people are interested).
The new design has the screw holes cut and countersunk to accommodate short screws or what I did in my case was resin print some screws which I can cut off and glue in once the final paint is added.
On the inside, there is now a mounting point for the electronics. The Bargraph board slides in place first, then the proto board is screwed in place. This holds everything together without tape and makes it very compact and protected.
I also added my original mount that snaps in place if you would like to use that on an already printed/completed trap.
Instructions
The first thing of course is to print the two sides. If you have a larger built plate you can put both on at the same time. I suggest printing them one at at time (setting in Cura) for the best quality.
The sides are assembled as per the original instructions with a few exceptions.
- The screw holes for the side rods may need to be widened a bit. My rods use a larger screw so I had to drill them out slightly to allow them to pass through.
- Install the side rods with flathead screws which will countersink nicely into the back of the side panel.
- Now you can slide in the Bargraph board and install the protoboard using small screws (Remind myself to add in screw info here. If you're reading this, remind me in the comments.).
- The outside screws are not functional. I designed the countersunk holes to be a tad smaller than the screw head so you could use a countersink tool to "creep up" on the final size. I did this by gently twisting the bit by hand in each hole until it widened to the desired size. Then, simply insert the flathead screws.
...
Final Throughts
This is a small detail, but it adds a lot to the final look. The screw holes are not perfectly screen accurate because the original design of the side panels are not accurate to the GB1 trap. The placement however is as close as I could get with these limitations.
As I mentioned, I used resin printed screws (downloadable in files). I did this so I could easily cut off the threads and glue them in place without adding much additional weight.
(There is also a screw on the rear box... something to look into).
Hopefully this helps make your trap a little more accurate.
Category: PropsTags
Model origin
The author marked this model as their own original creation. Imported from Thingiverse.