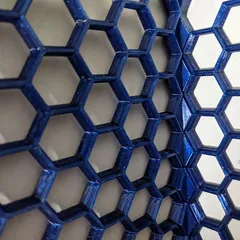
OpenSCAD Parameterized Honeycomb Storage Wall
Description
PDFI was looking at the Honeycomb Storage Wall and it looked pretty neat. And I noticed that there's already a few people making various smaller or tiny printable versions. But what if you could pick out the exact size that you wanted? Maybe you want a tall narrow one to fill a perfectly-sized gap… or a giant one for your giant custom printer that's enough to print a human… or a super-small one for your super-tiny printer?
OpenSCAD to the rescue! I spent a bit of time looking at the specification drawings and comparing what I was generating so it should be an accurate replacement.
When I uploaded this in 2022, there was a bunch of stuff but nobody had yet done much with OpenSCAD, but since then there's a whole pile of interesting things that people have done. It's been an explosion of all kinds of cool neat things! The most recent version of this contains a bunch of tweaks and changes that I thought were handy while I was covering every available wall in my living space with honeycomb storage walls.
Library requirements
This requires you to install the BOSL2 library to work. There's also a mesh, but you don't want the mesh, you want the OpenSCAD version so you can crank out whatever dimensions you desire.
How to use
The latest versions of OpenSCAD come with the “Customizer” interface such that you can just go over to the pane that's by default on the right side and adjust parameters. I've organized things into sections that you can expand as necessary.
Side of the wall
The two most important settings to use are numx and numy, which control the number of hexagons this will make in the X or Y axis. If you are matching other segments not generated via this tool, you might want to use the odd checkbox; that'll mirror along the X axis.
You may be able to completely ignore all of the modifier sections because this might be all you really wanted.
Wall modifiers: Solid section
This is used as the basis for some other sections. Basically, this lets you create a section with rows that are solid. Check the solid section checkbox to turn this on. You can use this as the basis for other modifications. solid start and solid end control which rows are made solid.
Wall modifiers: cutout
If you are building a honeycomb storage wall and there's a lightswitch or power plug or you just want to fish some larger cables through, you want a cutout.
Check the cutout checkbox to turn this feature on. cutout wall controls the wall that is surrounding the cutout, cutout x and cutout y control the size of the cutout, and cutout x offset and cutout y offset let you move the cutout.
Wall modifiers: vslot
You want to turn on a solid section modifier before you turn this on, otherwise it's just going to make a random useless cut across the part.
This will cut out a V-slot so that you can use the nuts and other parts intended for 2020 extrusions. I added a bit more floor to the V-slot to compensate for any sagging as a result of bridging.
Check the vslot checkbox to turn this feature on. vslot length controls the length of the slot (I'll make that go away sometime later). vslot x controls where the slot is with respect to the rows.
Wall modifiers: mounting screw holes
You want to turn on a solid section modifier before you turn this on, otherwise it's just going to make some random useless cuts in the part.
This will cut out a row of mounting screw holes intended for you to screw from the front into the wall.
Check the mounting screw checkbox to turn this feature on. Use mounting screw spec to pick the screw size and mounting screw head to make room for a screw head. mounting screw spacing will determine the distance between screw holes and mounting screw distance will determine the overall distance (set that to about the length of the whole wall segment) and mounting screw x controls where the slot is with respect to the rows.
Other tips
When you've got a stable configuration, it helps to hit the “+” button on top of the customizer to save a preset for your particular configuration.
It's not entirely obvious but you really want to mount this such that the side facing the print bed, the side where the hexagons are thickest, is facing towards you. That's the side the inserts are designed to go into.
Suggested printing settings
I'd suggest you print this with 3 perimeters and the original design was primarily intended to be printed with PETG so I'll just echo that. I used Matter Hackers PETG for my print.
Version history
v1.0 - April 5, 2022
- Initial version
v1.1 - November 4, 2023
- Fix to add a small chamfer that was in the STEP file of RostaP's original but not part of the drawings.
- Added the odd checkbox so that you could fit all possible other HSW panels
- Added the solid section, cutout, v-slot, and mounting screw modifiers based on my own needs
If you like this:
- I have a paramaterized 90 degree angle joiner, for the corners.
- I have a paramaterized ruler (or other long rectangular things) holder
- I have a paramaterized feeler gauge (or other stubby rectangular thing) holder
- I have a paramaterized ChipQuik liquid flux organizer
- I have a paramaterized de-soldering sucker holder
- I have a collection of all of the Honeycomb Storage Wall bits I use myself
Tags
Model origin
The author remixed this model.
Differences of the remix compared to the original
Converted the measurements of the honeycomb storage wall into OpenSCAD


