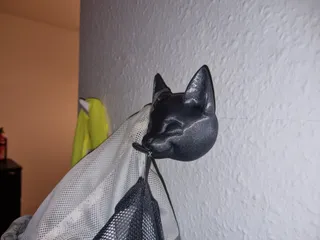
Dwayne the wall hook johnson (wall hook making system using prusaslicer)
Description
PDFI created the “Coat hanger with hidden screws and stealthy design" a few days before the hook competition started meaning it could not enter.
Instead i created some patterns which can be used to make anything a compatible hook!
This is how my new favorite super villain , Dwayne The Wall hook Johnson was born!
To use these all you need is: prusaslicer, my patterns and something you want to make into a hook!
This is made possible using the new negative volume tool! https://help.prusa3d.com/en/article/negative-volume_238503
Steps for recreation in Prusaslicer:
If in doubt open “dwayne the nosehook (prusaslicer demo).3mf file in a different prusaslicer window window for reference :)
1. Download and import Tête de The rock/Dwayne Johnson (aka Dwayne) to prusa slicer:
2. Use plane cut to remove base and back of head at 90 degrees to each other
(use rotate tool to rotate Dwayne then cut) (I cut just behind the ears)
3. Add negative volume twice by right clicking Dwayne, one for wall_mount_pattern and one for insertable_hook_pattern
5 . get both of the patters in view if not already (seems prusaslicer places them a bit oddly) this can be done by setting x and y to zero and pressing the drop to bed button in the part manipulation area.
6. Scale Dwayne to the appropriate an appropiate size (~150% for Dwayne) !!make sure to only select Dwayne from the side panel!! as otherwise you will also scale the patterns.
7. Move/rotate the wall_mount_pattern such that it is flush with the build plate and the flat side of Dwaynes head.
(Again make sure the thick side of wall_mount_pattern is facing the wall side)
8. move the insertable_hook_pattern such that the tapered side points upward (to avoid steep overhangs) and the end sticks out of Dwayne. I chose to have the hook stick out his nose
9. Slice the model and check that everything looks as expected.
10. Enable supports for build plate only (this works for Dwayne but other models may need more)
11. Press print!
Tip: To share your hook you can save your build saved projected and upload it.
Please join the wallhook competion!
Tips for recreation in Meshmixer:
(will make guide soon)
but left some tips here if you are already
A similar approach can be used in meshmixer with a couple of plane cuts and boolean differences. The benefit to this approach is you can export your hook as an stl and you can use some of the powerful tools in meshmixer for additional customization,
Tip: Do not use auto reduce option, when doing boolean difference.
Tip: Again make sure the thick side of wall_mount_pattern is facing the wall side!
Assembly
Screw the wall mount to the wall using appropiate hardware for your type of wall. (or if for very light duty double sided tape)
Slide your hook (Dwayne) over the mount
Add a bit of super glue to the insert-able hook.
Thanks to Dwayne for his magnificent face and to Loick3D for sculpting him (i think?)!
Tags
Model origin
The author remixed this model.


