MAXduino case for TZXduino / MaxDuino board from ProjectAVR

Simple case for MaxDuino board with MicroSD and OLED. Hinge-style buttons; designed in Fusion 360.
4
105
0
1253
updated December 13, 2024
Description
PDFI bought this "MaxDuino" board on eBay. It emulates a tape player for retro-computing. As I intend to use the board for my Acorn machines, it was modified to support Motor Control via the 3.5mm stereo plug.
Design
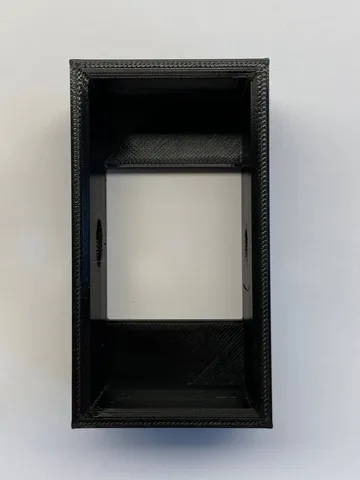
I used Fusion 360 to design a simple case that has a slot for the MicroSD card, a cutout for the OLED display as well as 3.5mm audio out and the mini-USB power connector. All model files are available.
PrusaSlicer settings
- Plater presets: 0.2mm Quality, Prusament PETG
- Print Settings > Layers and Perimeters > Vertical shells, increase to 3 perimeters
- Print Settings > Support Material > uncheck "Don't support bridges" (Advanced mode setting)
--> By default, PrusaSlicer will NOT create supports under long bridging sections. The results were very poor with this default value.
Supports
- Choose "everywhere" for the supports to ensure the USB / audio / MicroSD ports are printed correctly
- Then, use the "Paint-on supports" feature to REMOVE (right-click) supports from the icons on the buttons
Printing
- I used PETG "Prusament" filament on my Prusa Mini printer.
- Temperature settings etc. are left at default.
- The top case is printed as a single part; the buttons are "hinge-type" just like on the Prusa Mini.
- This takes about 2.5 hours to print
- The bottom cover takes about 45 minutes to print
Assembly
- The PCB fits quite tightly; you may have to slightly bend the case outward to allow the USB and audio connector to slide in
- The bottom cover plate protects the PCB from short-circuits and other damage; it uses small 3x12mm self-tapping screws
Result
Overall I'm quite happy with this first revision of the case:

There is some room for improvement:
- The MicroSD cutout has large overhangs that do not print nicely, even with full supports enabled.
- Not sure how to improve this - I'm open to suggestions
- The button icons have fairly large overhangs that are not always printed nicely.
- Perhaps use outlines instead of cutouts to improve print quality?

Tags
Model origin
The author marked this model as their own original creation.